gitGraph commit id: "c0d8f13" commit id: "e91c5aa" branch sensitivity-analysis checkout sensitivity-analysis commit id: "1a2b3c4" commit id: "5d6e7f8" checkout main commit id: "7b2e0d4"
Version control and reproducible research
PHS 7045: Advanced Programming
Preamble
Today’s lesson
We will learn about version control and GitHub.
Set up git and GitHub (make sure it works).
Part I: Intro
Brief review of technologies
Throughout the course, we will be using the following tools:
- R (duh!)
- Some R GUI, e.g., RStudio or Visual Studio Code.
- GitHub co-pilot: An AI-powered pair programmer (when OK; more on this later).
What is ‘version control.’
[I]s the management of changes to documents […] Changes are usually identified by a number or letter code, termed the “revision number”, “revision level”, or simply “revision”. For example, an initial set of files is “revision 1”. When the first change is made, the resulting set is “revision 2”, and so on. Each revision is associated with a timestamp and the person making the change. Revisions can be compared, restored, and with some types of files, merged. – Wiki

Why do we care
You might have seen this…
mydocument.txt
mydocumentversion2.txt
mydocumentwithrevision.txt
mydocumentfinal.txt
Or even this…
mydocument2016-01-06.txt
mydocument2016-01-08.txt
Why do we care
Have you ever:
- Made a change to code, realised it was a mistake and wanted to revert back?
- Lost code or had a backup that was too old?
- Had to maintain multiple versions of a product?
- Wanted to see the difference between two (or more) versions of your code?
- Wanted to prove that a particular change broke or fixed a piece of code?
Why do we care (cont’d)
Have you ever:
- Wanted to review the history of some code?
- Wanted to submit a change to someone else’s code?
- Wanted to share your code, or let other people work on your code?
- Wanted to see how much work is being done, where, when, and by whom?
- Wanted to experiment with a new feature without interfering with working code?
In these cases, and no doubt others, a version control system should make your life easier.
– Stackoverflow (by si618)
Git: The stupid content tracker
During this class (and perhaps, the entire program), we will be using 
- Git is used by most developers in the world.
- A great reference about the tool can be found here
- More on what’s stupid about Git here.
How can I use Git
There are several ways to include Git in your work pipeline:
Through the command line:
gititself – works everywhere, including on remote servers like CHPC.GitHub CLI (link),
gh, for everything related to GitHub.
Through a standalone Git GUI: GitHub Desktop (link)
Through the Git support built into your editor:
More alternatives here.
A Common workflow
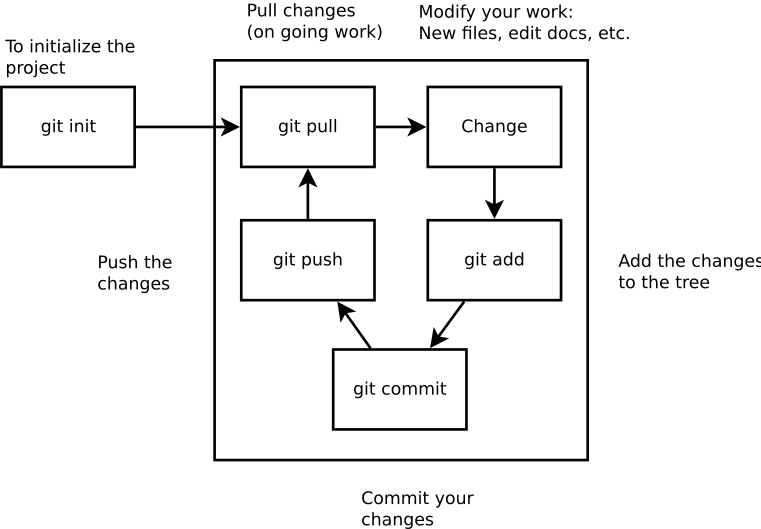
Git has a ton of features, but the daily workflow only features a handful of commands: git pull, git add, git commit, and git push.
A Common workflow
- Start the session by pulling (possible) updates:
git pull
Make changes
(optional) Add untracked/new files:
git add [target file](optional) Stage modified files:
git add [target file](optional) Revert changes:
git checkout [target file]
- Move changes to the staging area (optional):
git add
Commit:
If nothing pending:
git commit -m "Your comments go here."If modifications are not staged:
git commit -a -m "Your comments."
- Upload the commit to the remote repo:
git push.
Part II: Hands-on local git repo
Hands-on 0: Introduce yourself
First, install git in your system (if you haven’t done so already). You can find instructions here.
Next, set up your git install with git config, start by telling who you are
$ git config --global user.name "Juan Perez"
$ git config --global user.email "jperez@treschanchitos.edu"
Try it yourself (5 minutes).
More on how to configure git here.
Hands-on 1: Local repository
We will start by working on our very first project. To do so, you are required to start using Git and GitHub so you can share your code with your team. For now, you can skip Github. For this exercise, you need to
- Create a new folder with the name of your project (you can try
PHS7045-first-project)
- Initialize git with
git initcommand.
- Create a
README.mdfile and write a brief description of your project.
You can find more information about the README.md file here
Note: Need a text editor? Check out this website link.
Hands-on 1: Local repository (cont’d)
- Add the file to the tree using the
git addcommand, and check the status.
Make the first commit using the
git commitcommand adding a message, e.g.$ git commit -m "My first commit ever!"And use
git logto see the history.
Looking at history: git log
git log --onelinea3f9c21 Add sensitivity analysis for PM2.5 lag
7b2e0d4 Fix column names in cleaning script
e91c5aa Add data cleaning script
c0d8f13 Initial commit- One line per commit, newest first
a3f9c21= short hash, a unique ID for that commit (like a DOI)- Full
git logshows author, date, and full message — pressqto exit
Note: Every commit gets a unique ID computed from its contents, so it’s a fingerprint rather than a sequential number. The first 7 characters are enough to refer to it.
Hands-on 1: Local repository (solution)
The following code is fully executable (copy-pastable)
# (a) Creating the folder for the project (and getting in there)
mkdir ~/PHS7045-first-project
cd ~/PHS7045-first-project

# (b) Initializing git, creating a file, and adding the file
git init

# (c) Creating the Readme file
echo An empty line > README.md

# (d) Adding the file to the tree
git add README.md
git status

# (e) Committing and check out the history
git commit -m "My first commit ever!"
git log
Hands-on 1: Local repository
Ups! It seems that I added the wrong file to the tree, you can remove files from the tree using git rm --cached, for example, imagine that you added the file class-notes.docx (which you are not supposed to track), then you can remove it using
$ git rm --cached class-notes.docxThis will remove the file from the tree but not from your computer. You can go further and ask git to avoid adding Docx files using the .gitignore file
Part III: A (Very) Short History of Git
Version control is 50+ years old
- SCCS (1972) → RCS (1982) → CVS (1986) → Subversion (2000) moved from single files to whole projects to multiple developers to atomic commits.
- Git’s major change: Every clone holds the full history, not only a working copy. This makes it a distributed version control system (DVCS).
Origin story
- 1991–2002: Linux kernel developed via emailed patches, no formal version control
From: torvalds@klaava.Helsinki.FI (Linus Benedict Torvalds)
Newsgroups: comp.os.minix
Subject: What would you like to see most in minix?
Summary: small poll for my new operating system
Date: 25 Aug 91 20:57:08 GMT
Organization: University of Helsinki

Hello everybody out there using minix -

I'm doing a (free) operating system (just a hobby, won't be big and
professional like gnu) for 386(486) AT clones. This has been brewing
since april, and is starting to get ready. I'd like any feedback on
things people like/dislike in minix, as my OS resembles it somewhat
(same physical layout of the file-system (due to practical reasons)
among other things).

I've currently ported bash(1.08) and gcc(1.40), and things seem to work.
This implies that I'll get something practical within a few months, and
I'd like to know what features most people would want. Any suggestions
are welcome, but I won't promise I'll implement them :-)

Linus (torvalds@kruuna.helsinki.fi)

PS. Yes - it's free of any minix code, and it has a multi-threaded fs.
It is NOT protable (uses 386 task switching etc), and it probably never
will support anything other than AT-harddisks, as that's all I have :-(.
Origin story (cont’d)
- 2002: Kernel team adopts BitKeeper, a proprietary Distributed Version Control System, free to use for open source projects
- April 2005: Free license revoked after a licensing dispute
- April 2005: Torvalds writes Git from scratch in ~one week
- 2008 onward: GitHub launches – a web-based hosting service for Git repositories, with additional features like bug tracking, feature requests, task management, and wikis for every project.
Part IV: Hands-on cloud
Git is not GitHub
So far, everything we have done is local: git init, git add, git commit. No account, no internet, no company involved. That is the whole point of a distributed version control system – you have the complete history of your project on your laptop (.git folder).
| Git | The software. Free, open source, runs on your laptop. |
| GitHub | A website that hosts Git repositories and adds collaboration tools on top. |
GitHub is not the only option – GitLab, Bitbucket, and Codeberg do the same thing.
We use GitHub because that is where the scientific software community lives.
Nothing you have learned so far changes. GitHub is just another copy of your repository that happens to live on someone else’s computer.
What does GitHub add?
- A backup and a central copy: your laptop dies, your work does not.
- Collaboration: issues (to-do lists that anyone can file), pull requests (proposed changes), and code review – this is how you will submit your work in this class.
- Visibility: a public record of what you have built. For better or worse, this is a professional portfolio.
What does GitHub add? (cont’d)
- Automation (GitHub Actions): run your tests, or re-render a report, every time you push.
- Publishing (GitHub Pages): free websites straight from a repo. The website for this course is one.
- Reproducibility: a repo can be archived with a permanent DOI (e.g. via Zenodo) so a paper can cite the exact code that produced its results.
The vocabulary you need
git clone: download a full copy of an existing repository (history included).
- Remote: a copy of your repository somewhere else. Each remote has a short name, so you don’t have to retype the URL. By convention the main one is called
origin.
git push: send your commits to the remote.
git pull: bring the remote’s commits down to you.
The vocabulary you need (cont’d)
- Fork: your copy of somebody else’s repo, living on GitHub under your account.
- Pull request (PR): “please pull my changes into your repository” – a proposal, plus a place to discuss it.
A repo can have several remotes. Local and remote history are separate until you push or pull.
Before we continue: get an account
If you do not have one yet, sign up at github.com.
- Pick a username you would be happy to put on a CV. It is hard to change later, and it will appear in every URL you share.
- Use an email you will keep after graduation (you can add your university address as a secondary one).
- GitHub requires two-factor authentication for accounts that contribute code. Set it up now rather than at the deadline.
- As a student, apply for the GitHub Education benefits – free Copilot, among other things.
First: how does GitHub know it is you?
Before pushing anything, we need to talk about credentials. Since August 2021, GitHub no longer accepts your account password for Git operations. You have two options:
- HTTPS + Personal Access Token (PAT): you generate a token on GitHub (Settings > Developer settings > Personal access tokens) and paste it where the password used to go.
- SSH keys: you generate a key pair once, give GitHub the public half, and never type anything again.
Good news: the GitHub CLI sets all of this up for you – we will get there right after doing it the hard way.
Credential helpers
A credential helper stores your token so you are not asked every single time:
# macOS
git config --global credential.helper osxkeychain

# Windows (installed with Git for Windows)
git config --global credential.helper manager

# Linux
git config --global credential.helper libsecret
With SSH keys you do not need one – the key is the credential.
Hands-on 2: Remote repository
Now that you have something to share, your teammates are asking you to share the code with them. Since you are smart, you know you can do this using something like Gitlab or Github. So you now need to:
Create an online repository (empty) for your project using Github.
Add the remote using
git remote add, in particular
$ git remote add origin https://github.com/[your user name]/PHS7045-first-project.gitThen, use the commands git status and git remote -v to see what’s going on.
- Push the changes to the remote using
git pushlike this:
$ git push -u origin mainYou should also check the status of the project using git status to see what Git tells you about it. Origin is the tag associated with the remote repo setup, while ‘main’ is the tag associated with the current branch of your repo.
Hands-on 2: Remote repository (solutions a)
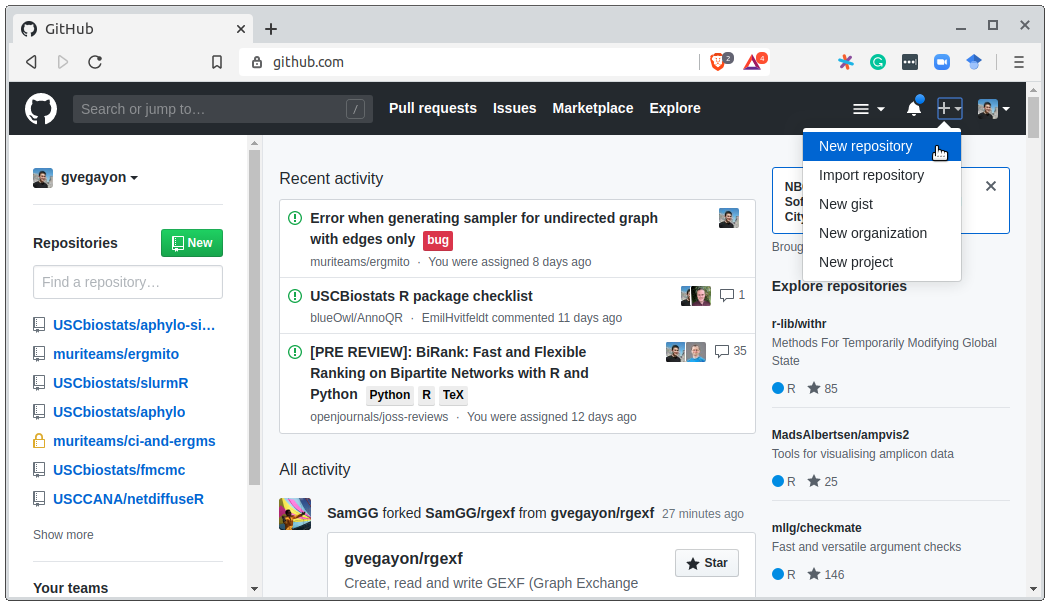
Hands-on 2: Remote repository (solutions a)
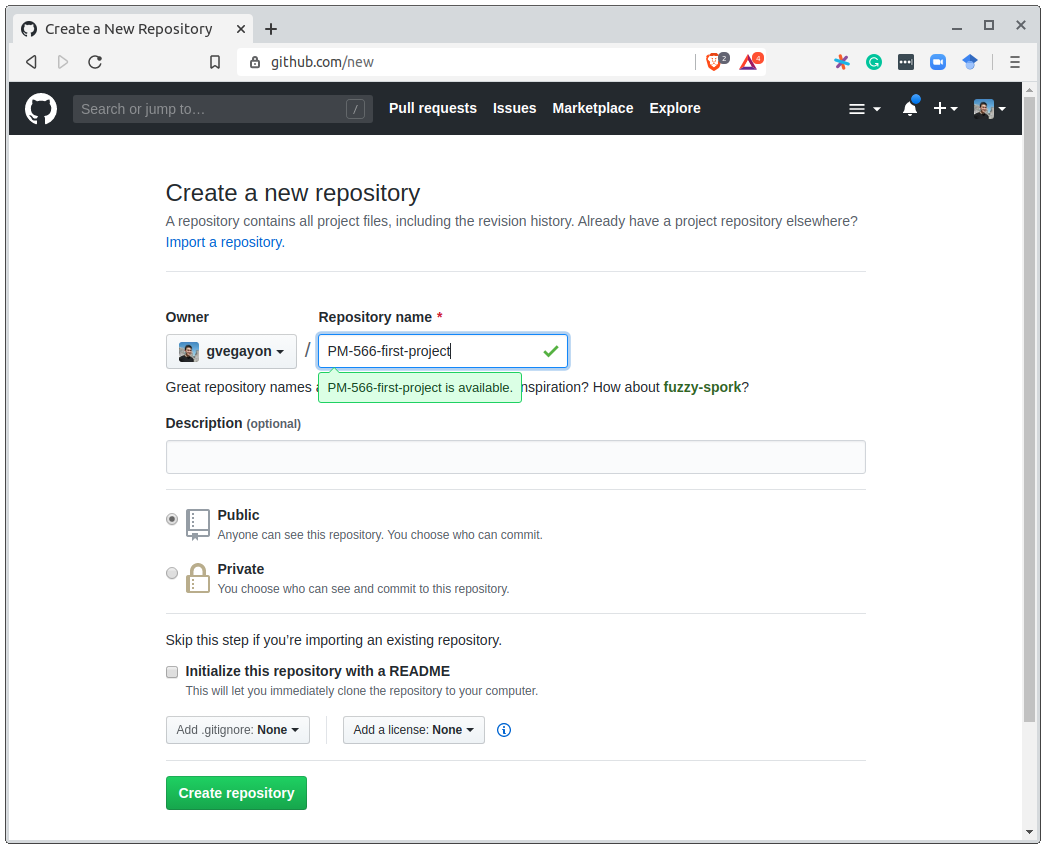
Hands-on 2: Remote repository (solutions b)
For part (b), there are a couple of solutions, first, you could try using your ssh-key (if you set it up)
# (b)
git remote add origin git@github.com:gvegayon/PHS7045-first-project.git
git remote -v
git status
Otherwise, you can use the HTTPS URL. The first push will ask for your username and a personal access token (not your GitHub password). Your credential helper stores it after that.
# (b)
git remote add origin https://github.com/gvegayon/PHS7045-first-project.git
git remote -v
git status
Hands-on 2: Remote repository (solutions c)
For the first git push, you need to specify the source (main) and target (origin) and set the upstream (the -u option):
# (c)
git push -u origin main
git status
The --set-upstream, which was invoked with -u, will set the tracking reference for pull and push.
Note: Older repos may use master instead of main — GitHub switched the default in 2020.
Getting updates: fetch vs pull
git fetch
Download new commits, update origin/main
- Your files: unchanged
- Your
main: unchanged - Safe to run anytime
git pull
git fetch + git merge
- Your files: updated
- Your
main: updated - Conflicts? You deal with them now
Note: git merge here just means “bring those commits into my branch” — we’ll see what happens when two people change the same lines later.
Branches: parallel lines of history
- A branch is just a name pointing to the latest commit
mainkeeps working- You experiment on the side on
sensitivity-analysis - Nothing touches
mainuntil yougit merge
. . .
git switch -c sensitivity-analysis   # create + move to it
git switch main                      # go back
git branch                           # list, * marks current
Merge conflicts in a pull request
GitHub says “This branch has conflicts that must be resolved” when your branch and main changed the same lines. GitHub only reports it – you fix it locally, on your branch:
git switch my-feature
git fetch origin
git merge origin/main       # bring main's changes into your branch
Git stops and marks every clashing spot in the file:
<<<<<<< HEAD
your version (the branch you are on)
=======
their version (origin/main)
>>>>>>> origin/main
Edit the file into what it should say, delete the three marker lines, then:
git add <file>
git commit                  # completes the merge
git push                    # the PR updates itself
git status lists what is still unresolved; git merge --abort backs out and starts over.
Merge conflicts: good habits
- Merge
maininto your branch, not the other way round. (git rebaseis tidier but rewrites commits you already pushed – leave it for later.) - Prevention beats cure: merge
mainoften, and keep pull requests small and touching few files. - GitHub’s web editor can resolve simple text conflicts in the browser, but only if you have write access to the branch.
Working from a fork? origin is your fork, so add the original repo as a second remote:
git remote add upstream https://github.com/OWNER/REPO.git
git fetch upstream
git merge upstream/main
The GitHub CLI (gh)
git knows nothing about GitHub – it only knows about remotes. Everything else (creating repos, pull requests, issues) usually means opening a browser.
gh is GitHub’s official command line tool: it puts the website part of GitHub in your terminal.
Installing it:
# macOS
brew install gh

# Windows
winget install --id GitHub.cli

# Linux (Debian/Ubuntu)
sudo apt install gh
Why we care in this class: it works over SSH on a remote server (like CHPC), where a GUI is not an option.
gh auth login
Run it once per machine:
gh auth loginIt asks you a handful of questions and then:
- authenticates you through the browser (no token copy-pasting),
- offers to generate an SSH key and upload it to your GitHub account,
- runs
gh auth setup-git, so plaingit push/git pullare authenticated too.
To check what is going on:
gh auth statusHands-on 2, redux: the one-line version
Everything we just did by hand in Hands-on 2 – create the repo on the website, git remote add, git push -u – is a single command from inside your local repo:
cd ~/PHS7045-first-project
gh repo create PHS7045-first-project --public --source=. --remote=origin --push--source=.tellsghto use the repo in the current folder (instead of creating an empty one)--remote=originadds the remote for you--pushpushes and sets the upstream- use
--privateif you would rather not share it with the world
Other gh commands worth knowing
# Clone one of your repos (no URL typing)
gh repo clone UofUEpiBio/PHS7045-advanced-programming

# Fork someone else's repo and clone your fork in one step
gh repo fork UofUEpiBio/PHS7045-advanced-programming --clone

# Open the current repo in your browser
gh browse
Pull requests – how you will be submitting your work:
gh pr create --title "Lab 1" --body "My solution"
gh pr status              # what is waiting on me?
gh pr checkout 42         # check out someone else's PR locally
gh pr view 42 --web
gh pr checkout 42 is worth the install on its own – doing that by hand means fetching a branch from a fork you have not configured.
Not a terminal person?
GitHub Desktop is a free GUI that covers the everyday workflow.
- Add > Create new repository or Add existing repository – this is
git init.
- The Publish repository button = create the repo on GitHub +
git remote add+git push -u, in one click (the same thinggh repo createdid).
- It is good at two things the command line makes awkward: reading diffs before you commit, and staging individual lines.
Caveats: no official Linux version (so it is not an option on CHPC).
So which one should I use?
Terminal (git + gh) |
GitHub Desktop | RStudio / VS Code | |
|---|---|---|---|
| Create + publish a repo | gh repo create |
one click | limited |
| Daily add/commit/push | yes | yes | yes |
| Reading diffs, staging lines | awkward | best | good |
| Works on CHPC | only option | no | no |
| Pull requests, issues | gh pr, gh issue |
partial | via extensions |
There is no wrong answer – they all drive the same .git folder, and you can switch between them in the same repository, even on the same day.
My advice: learn the command line, because it is the only one that works everywhere. Use a GUI for reviewing your changes before committing.
Example for .gitignore
Example extracted directly from Pro-Git (link).
# ignore all .a files
*.a

# but do track lib.a, even though you're ignoring .a files above
!lib.a

# only ignore the TODO file in the current directory, not subdir/TODO
/TODO

# ignore all files in any directory named build
build/

# ignore doc/notes.txt, but not doc/server/arch.txt
doc/*.txt

# ignore all .pdf files in the doc/ directory and any of its subdirectories
doc/**/*.pdf
Resources
Git’s everyday commands, type
man giteverydayin your terminal/command line. and the very nice cheatsheet.My personal choice for nightstand book: The Pro-git book (free online) (link)
Github’s website of resources (link)
The “Happy Git with R” book (link)
Roger Peng’s Mastering Software Development Book Section 3.9 Version control and Github (link)
Git exercises by Wojciech Frącz and Jacek Dajda (link)
Learn Git Branching – visualizes the commit graph as you type commands (link)
Oh My Git! – an open-source game for learning git (link)
Checkout GitHub’s Training YouTube Channel (link)
Bonus: Git under the hood
Everything so far was how to drive Git. These three slides are what it is doing – we will only cover them if we have time to spare.
What git init actually creates
git init creates exactly one thing: a hidden folder.
$ git init my-project && ls -A my-project/.git
HEAD config description hooks/ info/ objects/ refs/objects/– the database: every version of every file, every commit.
refs/– names for commits. A branch is not a copy of anything:refs/heads/mainis a file holding one 40-character hash.
HEAD– one line saying where you are:ref: refs/heads/main. You are always standing somewhere in the graph; this is the file that remembers where.
config– repo settings, including your remotes (whatgit remote addwrites).
index– the staging area, as a file (appears after your firstgit add).
Copy .git/ and you have copied the entire history. That is what “distributed” means: your clone is not a working copy, it is the whole repository.
Three kinds of objects
Everything in objects/ is one of three things:
- blob – the contents of a file. No metadata (no name, no path, no timestamp). Just bytes (stands for B(inary)L(arge)OB(ject)s). To identify it, Git computes a SHA-1 hash of the contents and uses that as the filename.
- tree – a directory listing: names + permissions pointing at blobs and other trees. Trees build the complete file hierarchy of files and subdirectories in git.
- commit – a snapshot of the project: one tree, the parent commit(s), author, date, and your message. Similar to a blob, Git computes a SHA-1 hash of the commit’s contents and uses that as the filename.
Read them yourself with git cat-file:
$ git cat-file -p HEAD           # the commit
tree 0f1d3b...
parent 8f2c1a...
author Juan Perez <jperez@treschanchitos.edu> 1755302400 -0600

My first commit ever!

$ git cat-file -p HEAD^{tree}    # its directory listing
100644 blob ed4b46d...    README.md
A commit is not a diff – it points at a full snapshot. The diffs in git log -p are computed on the fly by comparing two trees.
Content hashing
An object’s name is the SHA-1 hash of its contents: same input, same 40 characters, every time – and you cannot go backwards from the hash to the file.
$ echo "An empty line" | git hash-object --stdin
ed4b46dc10026c8bfe58aad14387e038a41f32ca
Same content \(\Rightarrow\) same hash \(\Rightarrow\) stored once. Copy a file into ten folders and Git stores one blob; the ten trees just point at it.
Change one byte \(\Rightarrow\) new blob \(\Rightarrow\) new tree \(\Rightarrow\) new commit hash. Git does not watch your files – it re-hashes them and compares.
A commit’s hash covers its tree and its parent’s hash, so it covers all the history behind it.
Two likely questions:
Could two files hash to the same name? In principle yes, in practice never (and Git now also supports SHA-256).
Must I type 40 characters? No – the first 7 do:
git show ed4b46d.
How does Git use SHA-1 hashing?
- Each object has a 40-character SHA-1 hash as its filename
- You can use the first characters as a shortcut (GitHub: 7)
- Git uses the first two characters to organize objects into directories
.git/objects/b6/542b259a8369b541cec92edd25bc45683f5805
.git/objects/ed/4b46dc10026c8bfe58aad14387e038a41f32ca
.git/objects/42/25cf9fa47985395c2b9e7c3601b765f51dede6
The files are compressed – display their contents in readable format with:
$ git cat-file -p b6542b259a8369b541cec92edd25bc45683f5805
I love git
Seeing the file tree: tree
tree prints a directory and its contents as an indented tree – handy for showing what a repository actually looks like on disk.
tree -a -L 2 my-projectmy-project
├── .git
│ ├── HEAD
│ ├── config
│ ├── objects
│ └── refs
├── .gitignore
├── README.md
└── data
└── pm25.csv-ashows hidden entries (that is how you see.gitand.gitignore)-L 2limits the depth to 2 levels-dshows directories only;-I "*.csv"ignores matching filestree -ainside a repo makes the point that.git/is just a folder
Installing tree
# macOS (Homebrew)
brew install tree

# Windows (Git Bash / MSYS2 has no tree; use one of these)
winget install --id GnuWin32.Tree
# or, in PowerShell/cmd, the built-in:
tree /F /A

# Linux (Debian/Ubuntu)
sudo apt install tree

# Linux (Fedora/RHEL)
sudo dnf install tree
No tree and cannot install it? find . -not -path "./.git/*" or ls -R get you most of the way there.
Undoing things
Amending and reverting: git reset
git reset <commit> moves your branch back in time. What happens to your files depends on the flag:
--soft– go back to an earlier commit but keep all the changes staged. Useful when you committed something you did not mean to and want to fix it and re-commit.--mixed(the default) – same, but the changes are left unstaged.--hard– reset the branch and throw away the changes. Nothing comes with you.
After a --hard reset the newer commits no longer show up in git log and are hard to recover. git reflog records where HEAD has been – use it to find the hash and git reset back to it.
Let’s try it
touch do_not_track.txt
nano git_cheatsheet.txt        # make some changes to your file
git add *
git commit -m "Changed cheat sheet"
OOPS! – do_not_track.txt should not have gone in.
git log --oneline
git reset --soft <hash of previous commit>   # or --mixed
Amending and reverting: git revert
git revert creates a new commit that undoes an earlier one – git reset erases history instead. Because it adds rather than rewrites, revert is the safe choice on shared branches.
git revert HEAD --no-edit # undo the latest commit--no-editskips the message editor and takes the default revert messagegit revert HEAD~xreverts an earlier commit (x= how many commits to go back)
$ git log --oneline
4406854 (HEAD -> main) Revert "<last commit message>"
Undoing git add: git restore
git restore <file>– restore the file to its last committed state (discards your edits)git restore --staged <file>– unstage it, but leave your modifications untouchedgit restore --source <hash> <file>– restore the file as it was at that commitgit checkout HEAD <file>– the older way of discarding local changes in one file
git restore is powerful but unforgiving: uncommitted changes it overwrites are gone for good.